.jpg)

Integrating PayPal API in Node.js is a crucial skill for developers looking to add secure and versatile payment solutions to their applications. With the rise of e-commerce and online transactions, PayPal remains a popular choice due to its reliability and widespread acceptance.
This blog post, brought to you by CodexCoach, will guide you through the steps to seamlessly integrate PayPal API in Node.js, ensuring you have the tools to enhance your application with efficient payment processing capabilities.
1. Introduction
Before we dive into the technical details, it’s essential to understand the importance of integrating PayPal API in Node.js. PayPal offers a broad range of payment solutions, from simple one-time transactions to more complex recurring payments.
For developers, the ability to integrate these services directly into their Node.js applications can significantly improve the user experience, offering them secure and flexible payment options.
2. Create a New Project
First things first, you need to set up your project environment. Create a new directory for your project and initialize it with npm init. This step is foundational as it prepares your project for further development and integration with PayPal API in Node.js.
mkdir paynode
cd paynode
npm install
npm init
3. Install Packages for Paypal Payment Gateway Using npm
Next, install the necessary Node.js packages for integrating PayPal API in Node.js. The paypal-rest-sdk is an official package that simplifies the integration process:
npm i express nodemon
npm i paypal-rest-sdk
These packages include Express for the web server and body-parser to parse incoming request bodies.
4. Create PayPal credentials
To integrate PayPal API in Node.js, you’ll need to create and configure your PayPal developer credentials. Visit the PayPal Developer Dashboard, create a new app under the ‘My Apps & Credentials’ section, and note down your client ID and secret. These credentials will be used to authenticate your requests to the PayPal API.
5. Create JS File
Create a new JavaScript file in your project, index.js, and set up your Express server. Include the PayPal SDK and configure it with your credentials:
const express = require("express");
const paypal = require("paypal-rest-sdk");

const PORT = 9000;

paypal.configure({
 mode: "sandbox", //sandbox or live
 client_id: "YOUR_CLIENT_ID",
 client_secret: "YOUR_CLIENT_SECRET",
});
app.get("/", (req, res) => res.sendFile(__dirname + "/index.html"));
app.listen(PORT, () => console.log(`Server Started on ${PORT}`));
This file will serve as the heart of your integration, managing the logic for payment requests and responses.
6. Checkout view
In the paynode directory, create a file called index.html.
Create a simple checkout view for your users. This can be a basic HTML form that posts to a route on your server initiating the payment process. Integrate PayPal API in Node.js by directing users to this checkout page when they’re ready to make a purchase.
<!DOCTYPE html>
<html lang="en">
<head>
 <meta charset="UTF-8">
 <meta name="viewport" content="width=device-width, initial-scale=1.0">
 <meta http-equiv="X-UA-Compatible" content="ie=edge">
 <title>PayPal Node App</title>
</head>
<body>
 <h1> Shoes </h1>
 <h2>Buy For $25</h2>
 <form action="/pay" method="post">
   <input type="submit" value="Buy">
 </form>
</body>
</html>
7. Payment handler
Implement a payment handler in your index.js. This handler will create the payment with PayPal and redirect the user to PayPal to complete the transaction:
app.post("/pay", (req, res) => {
 const createPaymentJSON = {
   intent: "sale",
   payer: {
     payment_method: "paypal",
   },
   redirect_urls: {
     return_url: "http://localhost:9000/success",
     cancel_url: "http://localhost:9000/cancel",
   },
   transactions: [
     {
       item_list: {
         items: [
           {
             name: "Red Sox Hat",
             sku: "001",
             price: "25.00",
             currency: "USD",
             quantity: 1,
           },
         ],
       },
       amount: {
         currency: "USD",
         total: "25.00",
       },
       description: "Hat for the best team ever",
     },
   ],
 };


 paypal.payment.create(createPaymentJSON, (error, payment) => {
   if (error) {
     console.error(error);
     throw error;
   } else {
     for (let i = 0; i < payment.links.length; i++) {
       if (payment.links[i].rel === "approval_url") {
         res.redirect(payment.links[i].href);
       }
     }
   }
 });
});


app.get("/success", (req, res) => {
 const payerId = req.query.PayerID;
 const paymentId = req.query.paymentId;


 const executePaymentJSON = {
   payer_id: payerId,
   transactions: [
     {
       amount: {
         currency: "USD",
         total: "25.00",
       },
     },
   ],
 };


 paypal.payment.execute(paymentId, executePaymentJSON, (error, payment) => {
   if (error) {
     console.error(error.response);
     throw error;
   } else {
     console.log(JSON.stringify(payment));
     res.send("Success");
   }
 });
});


app.get("/cancel", (req, res) => res.send("Cancelled"));
6. Add in package.json script
To simplify running your app, add a start script in your package.json:
"start": "nodemon index.js"This allows you to start your application with the command npm start, making it easy to launch your server and test your PayPal integration.
9. Run the app
With everything set up, you’re now ready to run your app and test integrating PayPal API in Node.js. Use the command npm start to launch your server and navigate to your checkout view to initiate a test payment.
npm start10. Download the Demo from Here
To further assist your learning, CodexCoach offers a downloadable demo of a fully integrated PayPal API in Node.js application.
This resource is invaluable for understanding the intricacies of the integration and serves as a reference point for your projects.
Conclusion
integrating PayPal API in Node.js can significantly elevate your application’s payment processing capabilities. By following the steps outlined in this guide by CodexCoach, you’re well on your way to implementing a secure and efficient payment system.
Remember, the key to successful integration lies in understanding the PayPal API and its SDK, combined with your Node.js skills.
This journey not only enhances your technical proficiency but also prepares you to tackle the challenges of e-commerce and digital payment systems head-on. Happy coding, and may your applications process transactions smoothly and securely!
Also read:
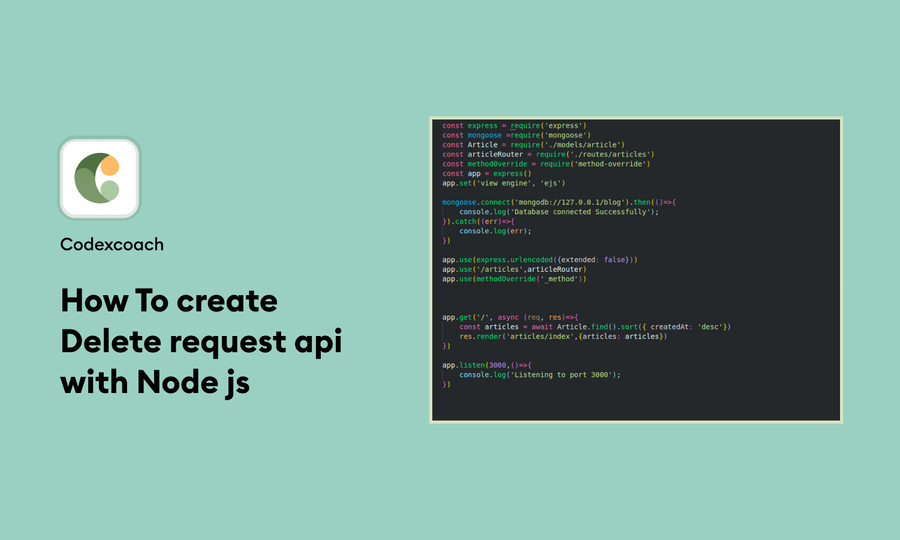
How To create Delete request api with Node js
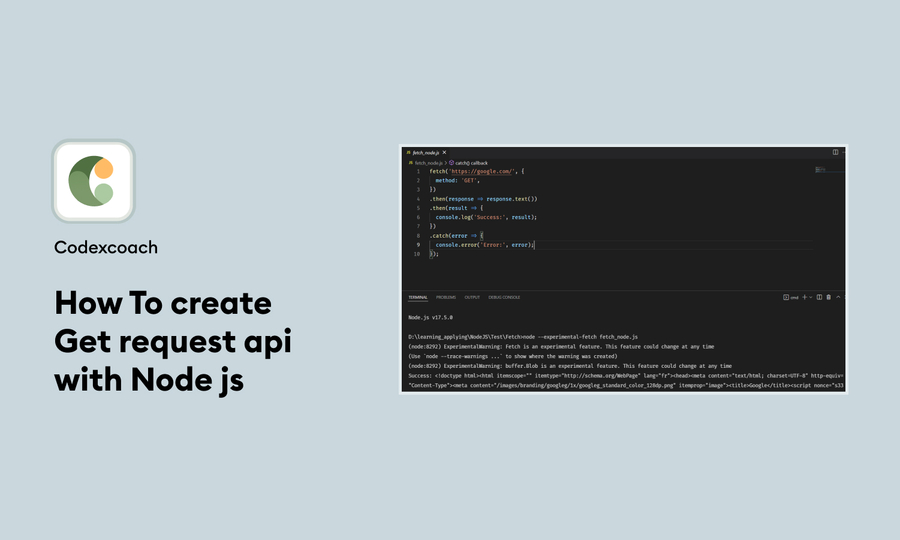
How To create Get request api with Node js