.jpg)

This guide shows you how to set up a Next.js application and add the Syncfusion React Grid component to it.
What is Next.js?
Next.js is a framework based on React that helps you build fast, SEO-friendly, and easy-to-use web applications. It includes features like server-side rendering, which helps your web pages load faster, automatic splitting of code to improve efficiency, a simple routing system, and built-in API routes. These features make it a great tool for developing modern web applications.
Preconditions
- Javascript
- Basic knowledge of Next js
- Node.js
- Visual Studio Code
We cover the below things,
- Create Next application
- Installation of Material UI Components of Grid
- How to Apply Material UI components of Grid from in Next js
Step-1: Setup
First, let us ensure that the development environment is set up. The requirements that follow should be met:
- Installed the Latest Version v20.12.2 of Node.js
- A Text editor and a terminal.
1. Create a new Next.js App
To start a new Next.js app, open a new terminal in the selected project folder, and type the following command:
npx create-next-app nextjs-grid --use-npmThis command will create the app.
2. Download smart-webcomponents-react library
Navigate to the nextjs-grid, open a CMD from within the folder, and execute the following command:
npm i smart-webcomponents-reactThis command will download the Smart Webcomponent React Components, including the Smart.Grid.
Must Read:- How to Create NextUI in Next.js? (React UI Library)
3. Configure the Home Page of the App
Navigate to
nextjs-grid/pages/index.jsthe file that includes the application’s main page.
Each page shows a React component. Let’s change it to add the Smart.Grid React component.
import Head from 'next/head';
import dynamic from 'next/dynamic';
import 'smart-webcomponents-react/source/styles/smart.default.css';
import styles from '../styles/Home.module.css';

//Dynamically import the Smart.Grid component
const Grid = dynamic(() => import('smart-webcomponents-react/grid'), {
  ssr: false, //no server-side rendering
  loading: () => <p>Loading...</p>
});

function Home() {
  const columns = [{
    label: 'ID',
    dataField: 'id',
	width: 200
  },
  {
    label: 'Name',
    dataField: 'name'
  }],

  sorting = {
	enabled: true
  },

  filtering = {
	enabled: true
  },

  selection = {
      enabled: true,
      checkBoxes: {
        enabled: true
      }
  },

  dataSource = [
		  {id: 1, name: 'Hydrogen'},
		  {id: 2, name: 'Helium'},
		  {id: 3, name: 'Lithium'},
		  {id: 4, name: 'Beryllium'},
		  {id: 5, name: 'Boron'},
		  {id: 6, name: 'Carbon'},
		  {id: 7, name: 'Nitrogen'},
		  {id: 8, name: 'Oxygen'},
		  {id: 9, name: 'Fluorine'},
		  {id: 10, name: 'Neon'},
		  {id: 11, name: 'Sodium'},
		  {id: 12, name: 'Magnesium'},
		  {id: 13, name: 'Aluminum'},
		  {id: 14, name: 'Silicon'},
		  {id: 15, name: 'Phosphorus'},
		  {id: 16, name: 'Sulfur'},
		  {id: 17, name: 'Chlorine'},
		  {id: 18, name: 'Argon'},
		  {id: 19, name: 'Potassium'},
		  {id: 20, name: 'Calcium'}
	],
    dataSourceSettings = {
      dataFields: [
        { name: 'id', dataType: 'number' },
        { name: 'name', dataType: 'string' }
      ]
    };

  return (
    <div className={styles.container}>
      <Head>
        <title>Create Next App</title>
        <meta name="description" content="Generated by create next app" />
        <link rel="icon" href="/favicon.ico" />
      </Head>

      <main className={styles.main}>
        <h1 className={styles.title}>
          Welcome to Next.js!
        </h1>

        <Grid id="grid" sorting={sorting} filtering={filtering} columns={columns} selection={selection} dataSource={dataSource} dataSourceSettings={dataSourceSettings}></Grid>
      </main>

      <footer className={styles.footer}>
        <a
          href="https://www.htmlelements.com/react/demos/grid/grid-chart-dynamic-data/"
          target="_blank"
          rel="noopener noreferrer"
        >
          Powered by{' '}
          <img src="https://www.htmlelements.com/wp-content/design/assets/images/logo-htmlelements.svg" className={styles.imgLogo} />
        </a>
      </footer>
    </div>
  );
}

export default Home;
We don’t want the Smart.Grid component to be rendered on the server, therefore it’s loaded dynamically.
Remember to include the smart.default.css file, which includes the Smart Library’s stylesheets.
4. Add additional page styles
nextjs-grid/styles/Home.module.cssAdd the following selectors to the bottom of the file:
@media (max-width: 600px) {
  .grid {
    width: 100%;
    flex-direction: column;
  }

  .main {
    width: 100%;
  }

  .smartGrid {
    margin: 20px auto;
  }
}

.imgLogo {
  padding: 20px;
  margin-left: 10px;
}

.smartGrid {
  width: 100%;
}
We will also make some adjustments to the styles of the page parts, as follows:
.container {
  min-height: 100vh;
  padding: 0 0.5rem;
  display: flex;
  flex-direction: column;
  justify-content: center;
  align-items: center;
  background: linear-gradient(135deg, rgb(12, 61, 120) 0px, rgb(252, 55, 82) 100%);
  color: white;
}

.main {
  flex: 1;
  display: flex;
  flex-direction: column;
  justify-content: center;
  align-items: center;
  width: 70%;
  justify-content: space-evenly;
}
Step-2: Build The Application
Running the Dev Server
Navigate to the app’s nextjs-grid folder, start a new terminal, and perform the following command:
npm run devThis command will start the development server on port 3000 by default.
Executing the command should result in the following:
> [email protected] dev C:\Users\Dell\Documents\GitHub\Team\demos\grid\nextjs-grid
> next dev

ready - started server on 0.0.0.0:3000, url: http://localhost:3000
info  - Using webpack 5. Reason: Enabled by default https://nextjs.org/docs/messages/webpack5
event - compiled successfully
event - build page: /next/dist/pages/_error
wait  - compiling...
event - compiled successfully
Open a browser and go to the http://localhost:3000 link to view the app.
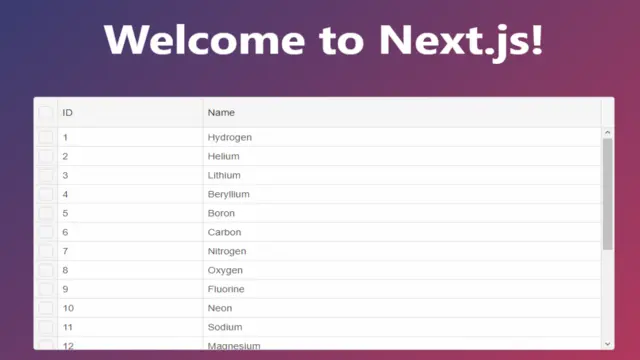
The result should be the following: