.jpg)
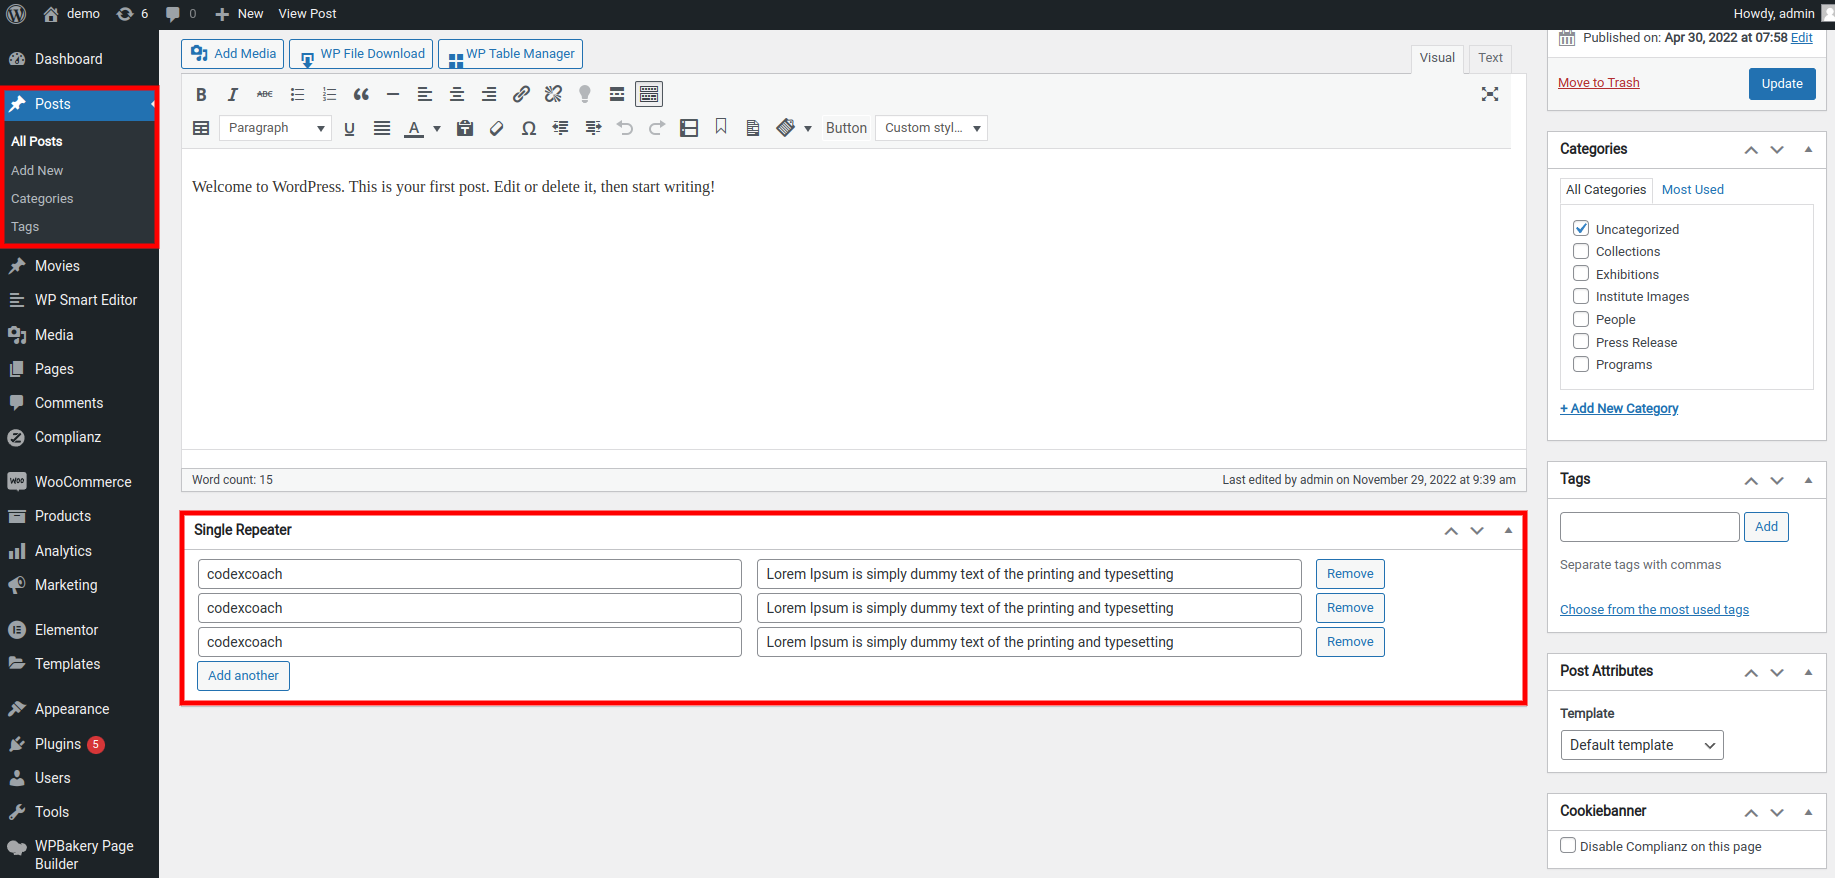
Repeatable Custom Fields in a Meta box Creating a “repeater meta-box” without a Plugin in WordPress. Add below code in your functions.php file (this file is located in your theme folder)
What is a repeater meta box?
A popular interface within a WordPress meta box is the repeater. It enables your client to create new custom fields for a specific piece of content on the fly.
What’s the use of the repeater meta box?
Meta boxes are useful, adaptable, modular edit screen elements that can be used to collect data about the post being edited. Your custom meta box will be displayed alongside all other post-related information, establishing a clear relationship.
Use this code One by One
<?php
add_action( 'admin_init', 'cxc_single_repeter_meta_boxes' );
function cxc_single_repeter_meta_boxes() {
	add_meta_box( 'cxc-single-repeater-data', 'Single Repeater', 'cxc_single_repeatable_meta_box_callback', 'post', 'normal', 'default' );
}

function cxc_single_repeatable_meta_box_callback( $post ) {
	$custom_repeater_item = get_post_meta( $post->ID, 'custom_repeater_item', true );
	wp_nonce_field( 'repeterBox', 'formType' );
	?>
	<table class="cxc-item-table">
		<tbody>
			<?php
			if( $custom_repeater_item ){
				foreach( $custom_repeater_item as $item_key => $item_value ){
					$item1  = isset( $item_value['item1'] ) ? $item_value['item1'] : '';
					$item2  = isset( $item_value['item2'] ) ? $item_value['item2'] : '';
					?>
					<tr class="cxc-sub-row">
						<td>
							<input type="text" name="<?php echo esc_attr( 'custom_repeater_item['.$item_key.'][item1]' ); ?>" value="<?php echo esc_attr( $item1 ); ?>" placeholder="Item 1">
						</td>
						<td>
							<input type="text" name="<?php echo esc_attr( 'custom_repeater_item['.$item_key.'][item2]' ); ?>" value="<?php echo esc_attr( $item2 ); ?>" placeholder="Item 2"/>
						</td>
						<td>
							<button class="cxc-remove-item button" type="button"><?php esc_html_e( 'Remove', 'cxc-codexcoach' ); ?></button>
						</td>
					</tr>
					<?php
				}
			} else {
				?>
				<tr class="cxc-sub-row">
					<td>
						<input type="text" name="custom_repeater_item[0][item1]" placeholder="Item 1">
					</td>
					<td>
						<input type="text" name="custom_repeater_item[0][item2]" placeholder="Item 2"/>
					</td>
					<td>
						<button class="cxc-remove-item button" type="button"><?php esc_html_e( 'Remove', 'cxc-codexcoach' ); ?></button>
					</td>
				</tr>
				<?php
			}
			?>
			<tr class="cxc-hide-tr">
				<td>
					<input name="hide_custom_repeater_item[rand_no][item1]" type="text" placeholder="Item 1"/>
				</td>
				<td>
					<input type="text" name="hide_custom_repeater_item[rand_no][item2]" placeholder="Item 2"/>
				</td>
				<td>
					<button class="cxc-remove-item button" type="button"><?php esc_html_e( 'Remove', 'cxc-codexcoach' ); ?></button>
				</td>
			</tr>
		</tbody>
		<tfoot>
			<tr>
				<td colspan="4">
					<button class="cxc-add-item button button-secondary" type="button"><?php esc_html_e( 'Add another', 'cxc-codexcoach' ); ?></button>
				</td>
			</tr>
		</tfoot>
	</table>
	<?php
}
?>
Save Repeatable Meta Box Use this code
<?php
add_action( 'save_post', 'cxc_single_repeatable_meta_box_save' );
function cxc_single_repeatable_meta_box_save( $post_id ) {

	if ( !isset( $_POST['formType'] ) && !wp_verify_nonce( $_POST['formType'], 'repeterBox' ) ){
		return;
	}

	if ( ! defined( 'DOING_AUTOSAVE' ) ) {
		define( 'DOING_AUTOSAVE', true );
	}

	if ( ! current_user_can( 'edit_post', $post_id ) ) {
		return false;
	}

	if ( isset( $_POST['custom_repeater_item'] ) ){
		update_post_meta( $post_id, 'custom_repeater_item', $_POST['custom_repeater_item'] );
	} else {
		update_post_meta( $post_id, 'custom_repeater_item', '' );
	}
}
?>
Repeatable Meta Box JQuery Use this code
<?php
add_action( 'admin_footer', 'cxc_single_repeatable_meta_box_footer' );
function cxc_single_repeatable_meta_box_footer(){
	?>
	<script type="text/javascript">
		jQuery(document).ready(function($){
			jQuery(document).on('click', '.cxc-remove-item', function() {
				jQuery(this).parents('tr.cxc-sub-row').remove();
			});
			jQuery(document).on('click', '.cxc-add-item', function() {
				var p_this = jQuery(this);
				var row_no = parseFloat( jQuery('.cxc-item-table tr.cxc-sub-row').length );
				var row_html = jQuery('.cxc-item-table .cxc-hide-tr').html().replace(/rand_no/g, row_no).replace(/hide_custom_repeater_item/g, 'custom_repeater_item');
				jQuery('.cxc-item-table tbody').append('<tr class="cxc-sub-row">' + row_html + '</tr>');
			});
		});
	</script>
	<?php
}
?>
Repeatable Meta Box Style Use this code
<?php
add_action( 'admin_head', 'cxc_single_repeatable_meta_box_header' );
function cxc_single_repeatable_meta_box_header(){
	?>
	<style type="text/css">
		.cxc-item-table, .cxc-item-table .cxc-sub-row input[type="text"]{ width: 100%; }
		.cxc-hide-tr{ display: none; }
	</style>
	<?php
}
?>
Important parts of this code
- The function is called cxc_single_repeatable_meta_box_callback, and it’s passed $post as an argument.
- The code then creates a new meta box with the name “Single Repeater”.
- The code starts by using jQuery to click on the .cxc-remove-item button.
- This will remove all of the items in a particular row from the repeater.
- Next, it uses jQuery to click on the .cxc-add-item button.
- The code will remove all the items from the repeater list when a user clicks on the .cxc-remove-item button.
- The code will add an item to the repeater list when a user clicks on the .cxc-add-item button.
- The code starts by setting up a variable called row_no.
- This is used to keep track of the number of rows in the table.
- The code then sets up another variable, p_this, which will be used to reference the current item on the page.
- The next line calculates how many rows are in the table and assigns that value to row_no: parseFloat(row_no); Next, it creates an HTML string with all of the hidden rows removed from it.
- It replaces any instances of rand_no with row_number and removes any occurrences of hide-custom-repeater-item from its content: var row_html = jQuery(‘.cxc-item-table .cxc-hide-tr’).html().replace(/rand_no/g, row_number).replace(/hide_custom repeater item/g,’custom repeater item’);
- The code is used to generate the HTML for a table row.
- The first line of code is used to find out how many rows are in the table.
- The second line of code uses jQuery’s .html() method to replace all instances of “rand_no” with the number found in the first line, and replaces all instances of “hide_custom_repeater_item” with “custom_repeater_item”.
- The code is a loop that iterates through the $custom_repeater_item array.
- The code then creates an HTML table with a row for each key in the $custom_repeater_item array.
- Each row has two columns: one column is for the value of the key, and another column is for text to be displayed next to it.
- Next, jQuery(‘.cxc-sub-row’) is appended to create rows within rows.
- The code above first creates a table with two columns and then appends three rows to it.
- The first row will have a class of “cxc-sub-row” and the second row will have a class of “cxc-sub-row”.
- Then, the third row will have a class of “cxc-sub-row”.
- Inside these cells are some text which represents what should be displayed for that particular cell’s content.
- The next section of code starts with an if statement that checks whether or not there is data in the $item_value array.
- If there is, then it sets up a repeater item for each value in the array, which are set as variables named $item_key and $item_value respectively.
- The repeater items have two input fields: one for title and another for description.
- After setting up all of these inputs, they also create a button called “Remove” which removes all of them at once by using cxc-remove-item class on it.
- After this comes a loop that iterates through each item in the repeater list (the ones created earlier) and creates an HTML table row with three columns: heading, description, and button to remove them from view altogether.
$item_value[‘title’] : ”; ? - The code is a simple example of how to use the WordPress custom repeater function.
- The code starts by defining the loop that will be used to iterate through all the items in the custom repeater.
- Next, it defines an array called $item_value, which contains each item’s value and title.
- Then, it creates a new variable called $item_key with the key of each item in the loop.
FAQ
What is the purpose of add_action?
The add_action function allows us to hook into WordPress and run our own custom code at specific times. In this case, we’re running our code when the admin page loads (admin_init).
What is the purpose of add_meta_box?
The add_meta_box function allows us to create a meta box on the post edit screen.
What is the purpose of cxc_single_repeatable_meta_box_callback?
The cxc_single_repeatable_meta_box_callback callback function defines what will be displayed in our meta box.
What is the purpose of get_post_meta?
The get_post_meta function allows us to retrieve custom fields from a post.
What is the purpose of wp_nonce_field?
The wp_nonce field function creates a hidden form field that contains a unique token. This helps prevent malicious users from submitting forms on your site.


String 12 “$banner_img” ???
I haven’t tried this as it looks like there is a quite a few typos. I can see repeater being spelt as ‘repeter’, ‘rapeter’, ‘rapater’ among other things.
Thank you for your support
I replace the plugin Advanced Custom Fields: Repeater Field with your code, thanks.
I implemented a repeater of name, rol and the image of a team work